- Phillips screwdriver.
-
Soldering iron.
-
New capacitors and new bulbs.
1. Disconnect the battery!
2. If they your steering wheel extend, you
should be able to get the dash module out without having to
remove the steering wheel. Extend it all the way out, and then
you should be able to slide it out of the same side as the
turn indicator, takes a little wiggle, but it works perfectly.
3. Else, you will have to remove the
steering wheel, be extremely
careful if your car is equipped with
airbags (see Bentley manual). You can remove the the plastic
cover under the steering wheel and access the 2 bolts that
hold the steering column up. Remove those bolts and the column
will drop enough for you to access the instrument cluster, you
can set off the airbag with this method!
4. Remove the
instrument cluster and open it.
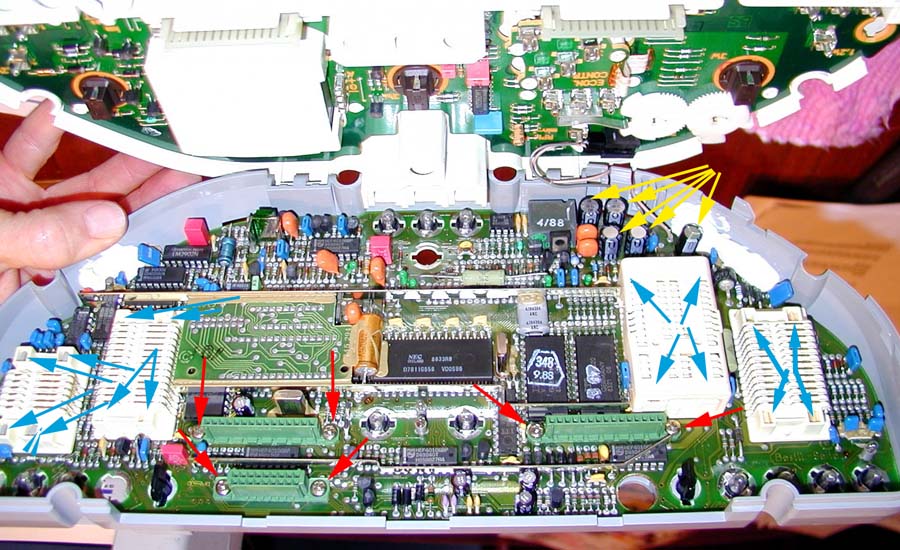
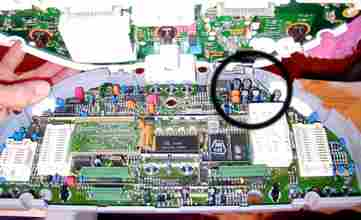
5. The yellow arrows are
the capacitor which go bad, the red arrows are the screws
which must be removed and the blue arrows are the retaining
clips which must be carefully pried back. Once that is done
you can remove the glue on the edges of the board and remove
the board.
6. Check the values printed
on the side of each capacitors (like 220mF 40V). It has been
suggested to replace them with 105°C capacitor but 85°C will
work fine.
7. But sure to take note
where each capacitor is located.
Check
polarity when removing and installing the capacitors or
you will damage your board. Capacitors are always marked as
far as negative and positive.
8. Use a
desoldering tool to remove the old capacitors and solder the
new ones without touching other connections on the board.
9. You should change all the light bulbs
while you have the cluster open!
10.
Recoat the bottom of the board with an insulating varnish for
the circuit board and reassemble.
Some capacitors don't have a value
printed on them: EPJ 22-40 W5 = 22 microfarad and 40 volt.
(Can be replaced with 50V ones.)
Bulbs part #
from Stewart Ebrat:
- 12V3W
(07.11.9.978.372) Quantity: 3
- 12V1.5W
(62.11.1.391.260) Quantity: 6
- 12V1.2W
(62.13.1.383.311) Quantity: 10 (Note same for OBC)
- OBC Light is #62 13 1 383 311 quantity:
3
- Heat and fan panel light: p/n 62 11
1 391 777 Quantity: 1
A thought on
Instrument clusters.
There are
three versions of the instrument cluster all with their own
code plug. You cant interchange the code plug in between the
different versions, but you can swap the entire cluster. Do be
advised when you take the old cluster you need the code plug
thats mounted inside the brown plug.
|
Application date |
Back plate colour | Code plug type |
Size |
Extra information
|
| start ->02/89 |
Grey
|
HML 075 |
2048 bytes |
No self test or
diagnosis via Modic. Stops at 299960. code plug is
non-standard |
|
02/89 -> 09/90
|
White
|
PIC 93C46 | 1024 bytes |
Self test + diagnosis
via Modic. Code plug is standard EPROM |
| 09/90 -> end |
Blue |
PIC 93C56 |
2048 bytes | Self test + diagnosis
via Modic. Code plug is standard
EPROM |
Clusters boards are different
inside and the bulbs are also different. The new instrument
cluster can be used in place of the older one, but the older
one won't work with the newer BMW E34 because there will be no
coding plugs (if you do not take the coding plug that is
inside the brown plug). The connectors are at different
locations on the newer cluster, but this doesn't affect the
functioning.
Coding Plugs
(from Bill R.)
The specific vehicle information is stored
inside the code plug. The information inside the plug is: the
fuel tank capacity, automatic or manual gearbox, electronic
automatic gearbox with S/E/M switch or standard automatic
gearbox (Ive only seen these on the 730i 6 cylinder), the
fuel consumption calculation data, the temperature indicator
offset and off course the mileage of the car. When replacing it you need all the
numbers that appear when you do the self test on the
instrument cluster. That will tell the dealer which version
hardware/sofware you have. You also must disconnect all
connectors on the back of the dash cluster with the battery
disconnected and wait a few minutes for all residual power to
drain to keep from damaging the memory on the coding plug.
THIS is a must. Also since the obc shares data with the coding
plug, the plug to the obc on the back of it must be
disconnected and wait at least one minute after the coding plug has been changed.
This will reset
the obc for the new coding plug.
To
switch from km to miles, you need to change the coding plug.
|

Coding plug |
| Images courtesy
of Hannu Myllynpää |
The problem with the coding plug is
that it counts only up to 300,000km or miles... After that
your odometer stops counting, we are still working on a
solution:
I have friend that lives in
Belgium and he used to work in a shop that reparied BMW dash
boards. English is his 4th language, but he is a smart guy. He
also states the instrument calibration is in the module which
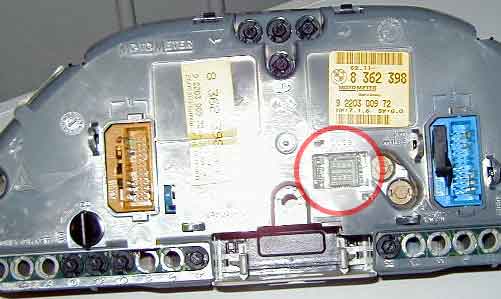
confirms my observation. Bill
Yep that is the odometer module. it
contains a 93C46 chip made by national semiconductor and uses
a communication port called microwire.it has 64 words of
memory (64 * 16 = 1024 KiloBIT). The odometer information is
stored as 16 words in what is caled a rolling-write memory.
Formula to calculate the data : Take mileage divide by 16 and
also remember the remainder. Take FFFF and substract the
hexadecimal (mileage /16). That is the data that needs to go
into ALL of the 16 memory locations. Now look at the remainder
you had from the division : that is the amount of times you
need to write hex(mileage/16) -1 so
for a mileage of 100 miles :
100 / 16 = 6 with a remainder of 4
FFFF - hex(6 ) -
FFF9
the memory dump becomes:
FFF9
FFF9
FFF9
FFF9
FFF9
FFF9
FFF9
FFF9
FFF9
FFF9
FFF9
FFF9
FFF9
FFF9
FFF9
FFF9
now modify the 4 first lines( 4 because
fo the remainder that was 4 ) to be FFFF- hex(6) -1 if
youneeded 101 miles then
it would have been the first 5.
FFF8
FFF8
FFF8
FFF8
FFF9
FFF9
FFF9
FFF9
FFF9
FFF9
FFF9
FFF9
FFF9
FFF9
FFF9
FFF9
this gives you exactly 100 miles on the
counter this rolling scheme allows them to write precise
information , and spread the writes across the eeprom . it
causes less wear and tear on the module and makes the memory
last longer. The module also contains calibration data that
pertains to maximum speed, gauge calibrations and more. To
calibrate that you need to have access to what is commonly
called the 'mother computer' from BMW . That machine can
update the data inside this module. When a dashboard was so
badly damaged it had to be replaced we copied the information
from one to another. problem was that we couldn't touch the
calibration data .So we only moved the odometer data. There
are other fields like oil change counters and lifetime counter
as well in that module. As well as your cars chassis number
and a couple of other things unique to your car .It's
basically your car's logbook and passport roled into one..
Coding plugs and
Fuel / Temperature Gauges: (Thank to Bill)
After changing the capacitors, the the gas
gauge and temp gauge were still dead.
I changed the instrument cluster and I
wanted to maintain the odometer reading, so changed out the
non volatile module and it made the gas gauge and temp gauge
quit. I put the new one back in and it worked. So it seems
that the coding plug can get corrupted and affect the gauges
also.
Capacitors don't
solve it all: (Stewart Ebrat)
Have
just solves 3 month long problem of no odometer, trip meter,
fuel gauge, service lights, economy gauge and message board.
Changed capacitors to no avail, searched Brunos site as well
as the forum's archive for any other answers but was left
disappointed. Only explanation was capacitors. Finally took
car to specialist Euro auto electrician who changed the whole
box below instrument cluster where globes and readout lcd's
are located. Luckily I did not change instrument cluster.
Total cost for labor and new box $450 AUD ($300 USD) and all
fixed. Box is actually second hand (stealer wants $1200 AUD
for new) but came with 24 mth warranty. Capacitors are not the
only cause of this problem. Hope this can help some other
board members avoid the frustration I experienced.
LCD, temperature
gauge and fuel gauge out: (Grant Patullo)
Just letting you know I had the dash in
my E34 535i fail about 12 months ago and I replaced the caps
as per the instructions on your website and everything was
fixed until 3 weeks ago when the LCD readout and the fuel and
temp gauges stopped working, so I pulled the dash out again
and replaced the small tantalum cap on the LCD and also
cleaned up few suspect solder joints and reinstalled the dash.
Whatever I did fixed the fault and the dash is working once
again.
Thanks for the great website and
keep up the good work.
Thanks
to
George D,
James Hartline & Bill Rikard
|