|
My weekend project was the replacement of the
flex disc and the center bearing support on the driveshaft
of my 1992 525i. I want to personally thank Winfred Dixon
for his excellent comments, advice and support for this project.
My car was making the usual progressively worse noises associated
with driveshaft related problems. I just didn't know how bad
the flex disk was until I looked at my new part and compared
it to what was left; basically just the bolts in the steel
sleeves surrounded by the remnants of the rubber and strings
of thin cord that was imbedded in the rubber. I am amazed
the car even moved!
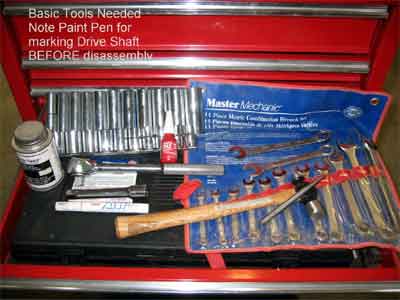
Before attempting this project I purchased a 3 1/2 ton floor
jack and 4 substantial jack stands. The Bentley manual mentions
at 1/2 page intervals that the car should be on jack stands
at the jacking points before getting under the car.
The reason I wanted to attempt this job was primarily to save
several hundred dollars but also to prove to myself that I
could do it. BMWs are made well but they can also be a tough
to work on.
 |
COSTS:
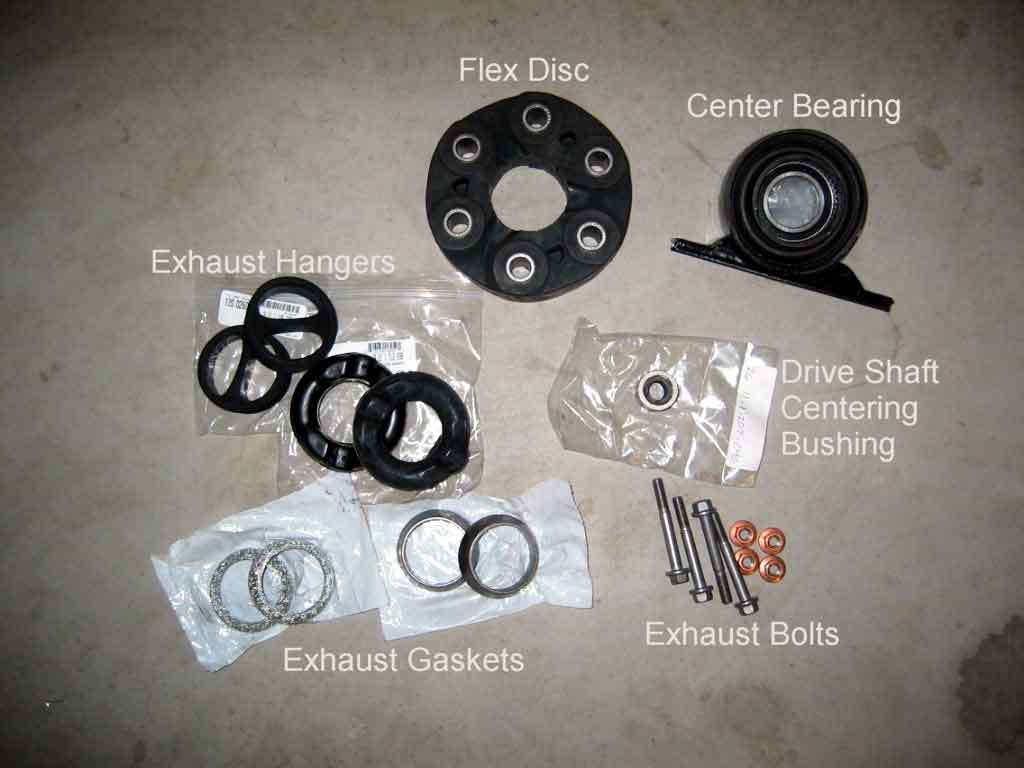
The BMW stealer wanted $110 for the flex disk and $88
for the center support bearing. I paid $39.95 and $32.00
respectively for the parts from BMA. I also needed to
order 6 new self-locking nuts for the driveshaft and 6
self-locking nuts for the flex disk; I ordered them from
the stealer for a cost of $8.00. The floor jack I picked
up for $60.00 and the jack stands cost me $62.00. I also
picked up a 19mm combination box wrench and a 1/2 inch
drive 19mm socket for a total of $14.00. Lastly, I purchased
a 1/2 drive 1 1/4 extended socket for
$7.00. My total costs including the tools I purchased
was $222.95 |
THE REPAIR:
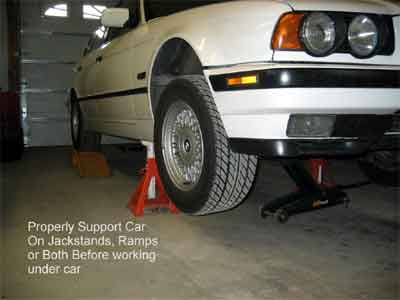 |
1. The first thing was to raise the car
up with the floor jack. I positioned it under the rear
differential and raised it up approximately 20 inches.
The jack stands were then carefully positioned at the
jacking points on the body just in front of the rear wheels.
For the front of the car I positioned the floor jack on
the cross member just behind the oil pan making sure I
did not touch the oil pan and raised the car approx. 20
inches and then positioned the jack stands under the jacking
points on the car just behind the front wheels. |
| |
|
 |
2. The next thing to do was to lower the
exhaust as much as possible. The Bentley manual says to
remove the exhaust, however, that is a lot of work and
not necessary. Before lowering the exhaust I positioned
the floor jack under and just touching the rear muffler.
Working from the rear muffler there are two muffler clamps
that require a 13mm socket. Moving forward and just before
the center resonator on the exhaust there were two more
muffler brackets requiring a 13mm socket for removal.
Finally, there is a bracket at the front secured to the
rear of the transmission that required a 13mm socket to
loosen the two bolts. Once everything was loose, I slowly
lowered the exhaust with the floor jack as much as possible
but still supporting it. |
| |
|
 |
2. Next was the removal of the heat shield.
There were approximately 6 bolts that required either
a 13mm socket or 13mm combination box wrench. Once the
bolts are out you need to finagle the heat shield out
and put it on the floor
and out of the way.
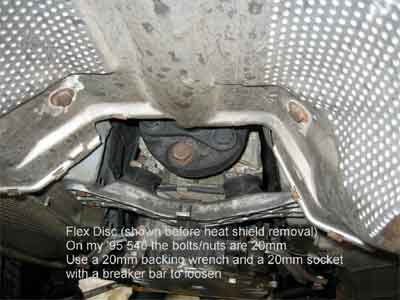
3. The next item was the removal of the bolts from the
flex disk. Keeping the car in park (I have an automatic
trans)I found that BMW really puts these bolts in tight.
I couldn't even budge them with my breaker bar. Using
my 19mm wrench on the nut and 19mm socket on the bolt,
I finally broke the nut loose by sliding and 18 inch piece
of pipe over my wrench for some leverage. To access each
bolt I had to turn the driveshaft by hand after taking
the car out of park and repositioning my wrench.
|
| |
|
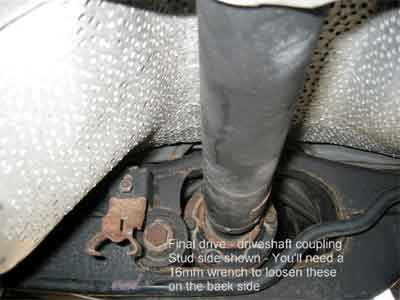 |
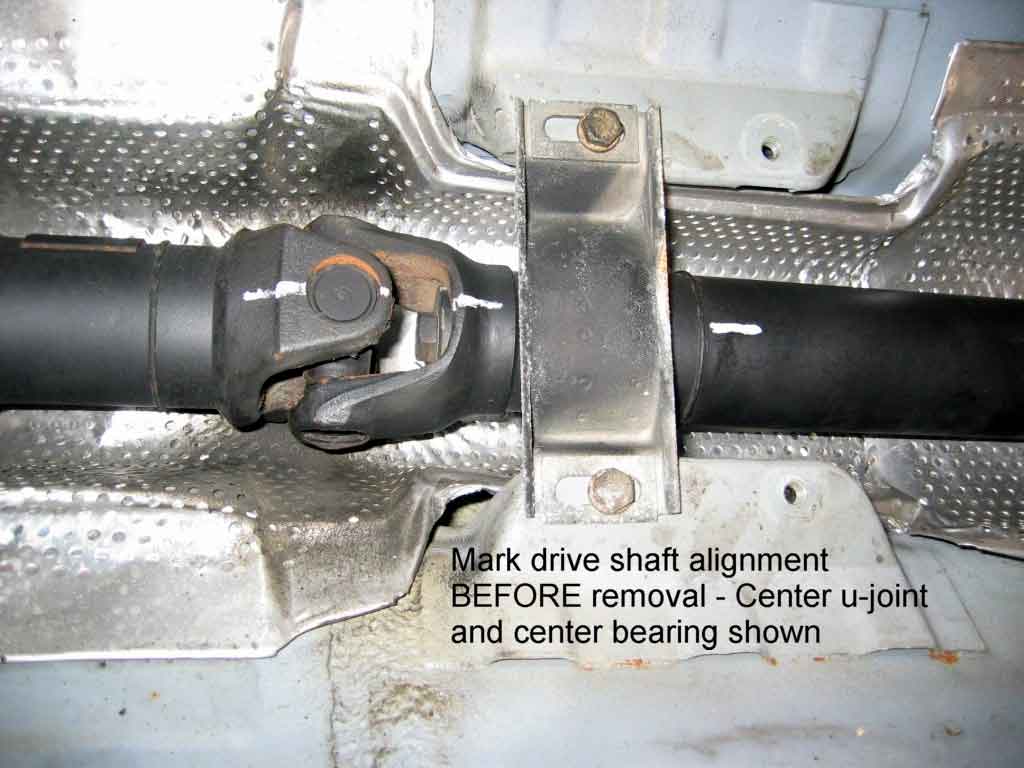
4. The next job was to remove the nuts from
the rear of the driveshaft. Before you remove the driveshaft
paint on marks where it pulls apart for proper alignment
when being reinstalled. They required a 13mm wrench and
the length of pipe to break them loose.
|
| |
|
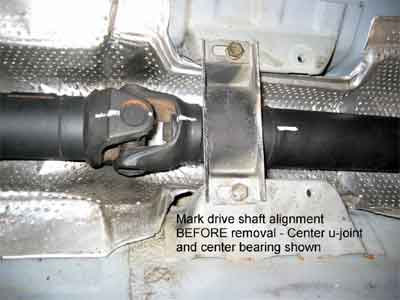 |
5. The center support bearing was next.
It was held in place by two bolts that require a 13mm
socket.
6. Once the driveshaft was loose, I lowered the exhaust
a little more and worked the driveshaft out and onto the
floor. |
7. Although my center bearing was not damaged, at the suggestion
of Winfred Dixon I replaced it anyway, just in case. The center
bearing is pressed on between the front and rear drive shaft.
In order to access the center bearing, the front and rear
drive shaft have to be taken apart. There is a 19mm bolt that
holds them together. Before taking the driveshaft apart I
pained marks on the front and rear driveshafts near the center
bearing for proper alignment later. I had to put the rear
of the driveshaft in my bench vise to work on this. The bolt
holding the two together is really in there! Using my 19mm
box wrench with the 18 inch pipe slid over the wrench for
leverage, I finally broke it loose. The bolt was a tough out
requiring small turns and effort to the last thread. I needed
to take a few turns and tap the rear of the driveshaft to
loosen it from the front spline until it finally came off
the spline. The center bearing is pressed on over the spline.
I used a hammer and an old dull chisel to carefully loosen
the center bearing and then slide it off.
8. Replacement of the center bearing was easy; you just have
to make sure that it is positioned correctly. I used my 1/2
drive 1 1/4 inch extended socket to firmly tap the center
bearing into place.
9. The driveshaft was now ready to be bolted together. I put
a little CRC on the inside threads of the spline to make putting
the bolt in a little easier. Positioning the front and rear
driveshafts according to the painted marks, I bolted them
together in the same fashion as I took the bolt out. Be sure
that the bolt is tight.
10. Now the driveshaft was ready to be installed. I bolted
the rear of the driveshaft up first using the new 13mm self-locking
nuts. You can access 3 of the bolts at a time. I had to position
a screwdriver through the area where the front and rear shafts
meet to keep the drive shaft from turning while I was tightening
the bolts. Also, I found it easier to mount the center bearing
only putting the bolts in finger tight during the process.
11. Next was to intstall the flex disk. In order to do this
I had to unbolt the center support bearing so that I could
slide the front of the driveshaft into the center bearing
and onto the transmission spline. Its important to note that
there is a certain way that the flex disk is installed. There
are 3 flanges on the front drive shaft that will positioned
at the rear of the flex disk and 3 flanges that are on the
transmission spline that will be positioned at the front of
the flex disk. The flex disk has arrows imbedded in the rubber
that point to either the front transmission spline or the
rear drive shaft spline. Those arrows need to aligned correctly.
Once done, intstall the bolts and nuts and tighten appropriately
with 19mm wrench and socket wrench.
Note from Rich W.
One comment - on the page that describes the replacement of
the flex disk and center support bearing, the work description
skips over the need to avoid torquing the bolt on the "soft"
side of the buigo. As you know, putting serious torque to
the end of the bolt on the disk side rather than doing your
wrenching on the flange side places a serious strain on the
cord in the guibo, leading to premature failure. Not good!!
This should be included I think.
Finally reinstall heat shield, exhaust brackets and lower
car.
NOTES from Peter H.
I used my Bentley manual and your website for reference. Both
are great resources. This is the first time that I have ever
encountered any discrepecies in either the book or your website.
I had the driveshaft off and was looking for the collar to
loosen to separate the two halves of the driveshaft at the
spline and there was none! I looked at it, consulted both
pages in the book and the website because I figured that I
must be missing it, but it wasn't there. So off to the dealer
with driveshaft in hand. I got there and talked to the sevice
manager and he said sometimes you have to replace the driveshaft!!
They took it, said it would be about 1.5 hours labor after
they looked at it and said they could call when it was done.
They called later in hte afternoon and said it was done with
a bill of 148.35 for labor and shop charges. I also had them
press off and install the new centerbearing while they had
it since I could not separate the shaft myself. In all I spent
about $220 for everything and it works great. I just wanted
to tell you so that the website could let everone know that
if they take this on, while a fairly staight foward operation,
they might have a little problem with the driveshaft. Thanks
for all the great information. I hope I could be of some help
to other people that love their cars!!
Thank you,
1993 e34/m50
Thanks to Al Gray and Steve

|