|
This method gives you fuse protected rear foglights with
the factory dash indicator without going thru the light control
module in the electronics box under the hood.
- Euro fog light switch p# 61
318-351-238 BMA or Pacific BMW
- 2 bulb sockets (same as backup bulb
socket, dealer)
- 1 generic fog light relay with
wiring harness (usually 30amp 12v. it's overkill, but they
are cheap and available)
- 15' 24 gauge Teflon insulated wire.
- 15' 18 gauge wire
- 1 1.2w dash indicator lamp with
socket (Wagner makes one for BMW comes 2 for $2.99).
- 2 inline fuses (1-2amp and 1 5 amp)
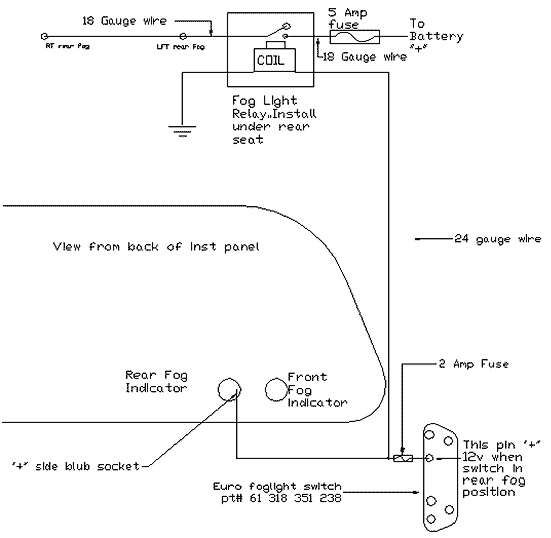
You must solder the switched + for the foglight switch to
the rear foglamp indicator bulb contact on the bulb itself.
Use a meter to see which side of the circuit board on back
of instrument panel is grounded, wire goes to opposite side
on bulb (if it's wrong 2a fuse will blow)
Rear foglight socket must be cut out and
cleaned up with xacto knife and or small file so that backup
light socket will fit in. Follow the pattern you see on the
plastic plug. The contacts for the bulbs can be made from old
speednuts or other material that you can solder wires to, look
at the other conectors for pattern.
ALTERNATE
PROCEDURE FROM attackeagle
Step 1: Installing Euro Fog Switch
The
switch will simply plug into the existing harness and
connector,
however it will be missing the 4th wire for the
rear fog output.
Instead of cutting the complete plug out
to solder in a entire Euro harness plug, I found it easier to
disassemble the existing connector and add the one missing
wire to the original connector.
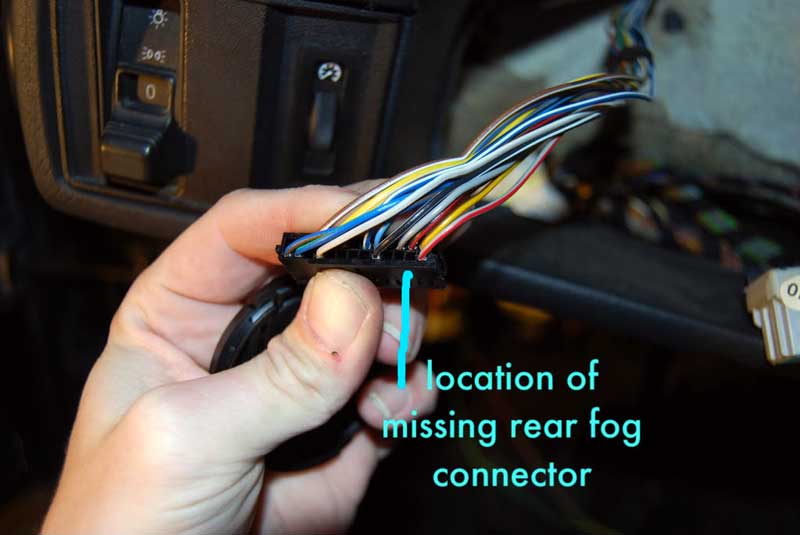
Step 2: INDICATOR BULB
The prior
instructions on e34.net about how to add the indicator
bulb
annoyed the hell out of me. The instructions and
diagram previously indicated to solder
the wire from the
switch directly to the bulbs positive side.
Not good idea IMO.
Since I had the steering column out and the battery
disconnected, I decided to pull the cluster and find which pin
was the one for the rear fog indicator light with my
multimeter. It is in the long connector on the left side.
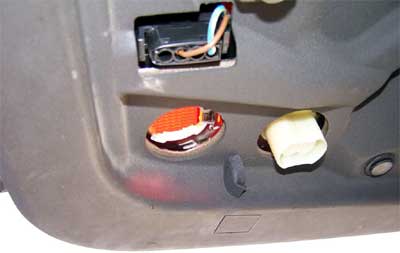
After removing the slide off white outer shell, I shot a
picture so you can see where the connector is missing the
"female side" for the rear fog indicator bulb +. The pin is on
the cluster itself, just not in the connector or harness. All
you need is wire and the socket side of the pin installed in
the connector to 'do it right' so the bulb can be changed
out.
The location to add it is 2nd from the
bottom right hand side (above a grey/red, and catty cornered
from a yellow). see picture below:
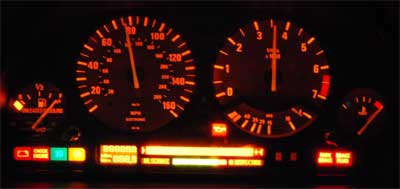
I added a tiny pin socket to the
connector, and wired that to the fog light switch's rear
pin
The tiny pin socket i got from a spare connector, like
those used for the 3 pin mirror, or the later 4 pin connector
c-pillar light, but it still needed to be shaved down with a
dremel to fit into the dash connector.
Now I do have my
amber rear fog indicator light, just as it should be.
Step
3: wiring to the relay.
some people have asked questions about
the wiring, how I ran it and if I had any pics.
I have no
pics, as there is nothing to take a picture of.
I ran the
wire from the fog switch down the left side of the car to the
rear seat area, where it crosses with other wiring to
the
battery.
It is easy to tie the wire to existing
wiring above the pedal box this way. The fog switch area opens
into the stereo hollow and
straight down. It would be
inconvenient to try and run the wire across and above the
glovebox IMO. In addition, I had already
installed wiring
in that area for the Hella E-code tilt motors in this area and
knew exactly how I wanted to run it.
Step 4: Relay
Very simple: Follow diagram
above.
87: 12+ From Battery
30: To Rear Fogs
86: From
Switch
85: Ground
87a: Not used
I picked up a relay that had a diode
already in it to protect the OEM switch from induced voltage
(arcing) when turned off.
This I tucked just to the right
of the battery, where it is easy to get to if needed, but out
of the way. The diagram was very helpful to me, and I hope
everyone can read it.
Step 5: Relay to
Tailgate
I ran a single wire into the tailgate
along the right side. I chose that side because the wire
bundle is smaller on the right side,
and the battery is on
that side as well.
Tuck the wire under the backseat area
and under the side panels until you reach the right side cover
near the gate. Open the
hatch, remove the right harness
grommet and with a wire hanger or a wire puller tool reach
down inside the c pillar so you can
bring the wire up and
thru the larger grommet. Then either try to run it inside the
mesh or just run it alongside the existing meshed harness. Run
it thru the existing harness holders and guides after removing
the side covers.
But here is a pictures I shot where
you can see how I ran the wire into the hinge area. It comes
up thru the same grommet that holds the rest of the bundle,
and follows all the rest the wiring thru the hinge and into
the gate.
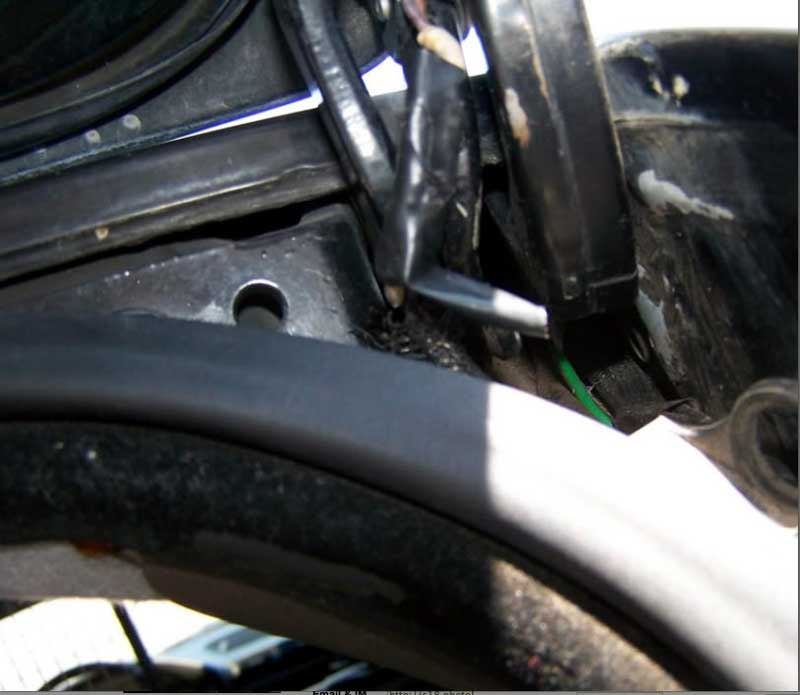
you can barely
see the green ( fog ) wire in this picture because I moved the
3rd brakelight wires aside for the picture... It is
the
only place it is visible in the entire run as it goes
into the factory gate channel and follows the existing wiring
into the gate itself
Step 6: Removing the
Lights from the tailgate to fit contacts and wiring them
up
It's easy to take out the
reverse/foglight assemblies if you have a 1/4 drive 8mm deep
well socket. If not you have to take the
entire inner gate
skin off. Tourings use a bulb socket that is not the same as
the Sedan... it is the same as an E32/ or E34 Touring reverse
socket.
I found it much easier to take the single wire on
the right side and then parallel the positive leads by running
a jumper wire
from the right side contact to the
left.
you can see how these contacts I scavenged from a
set of junk sedan taillights would not work in the touring's
very differently shaped sockets. I straightened them flat and
then rebent them to the desired shape with a crescent as a
mini vice/anvil and a body hammer.
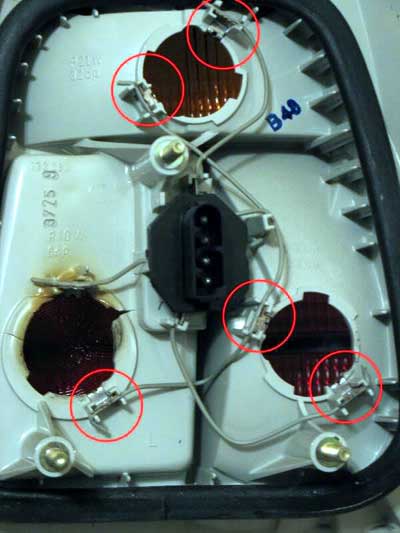
Then I used a
straight pick tool and the tiny body hammer to "stake" them
once they were in, so they would spread to become
pressure
fit like oem ones. It' s hard to see the reverse contacts
(it's noon and the gate is skywards to shoot this) but the oem
ones are shaped like the letters "IL" with the top of the "IL"
being joined and that top portion is inserted into a
slot.
The sedan taillights use a horizontal "U" shaped one
that clips with the open end over the edge of the bucket
itself.
SO I had to straighten them and reshape them
completely. They look oem and that is what I wanted so it was
worth the effort.
I used the existing ground (brown) for
the reverse bulbs as the ground for the fog light bulbs.
It
was a simple matter to tin the wires and solder them together
before the black 4 pin connector (connector pictured above).
Since the negative side is soldered to the existing negative
on the light, it uses the same connector. The positive wire
has a double heat shrunk spade and socket so it can also be
disconnected if there is a reason to remove the assembly
later.
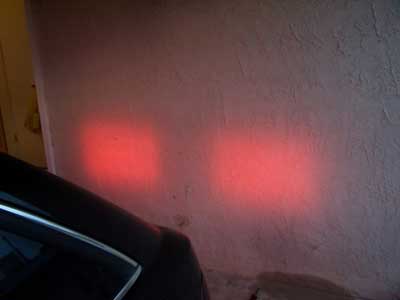
I was impressed by the light pattern
from the rear fogs.
It isn't just an extra positioning
light, but actually illuminates far behind you like the brake
lights do.
I hope this
helps you install rear fogs in your e34 touring... sedans are
apparently even easier.

|
