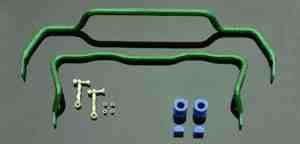
- Floor Jack
- 2 Jack Stands
- 13mm socket
- Socket extension
- 13mm wrench
- 18mm socket
- Additional 18mm socket or ¾ socket
- 22mm socket
- Vice Grips (small)
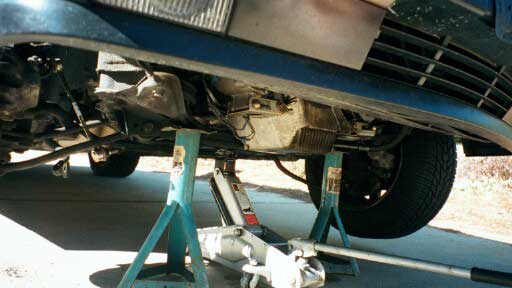
1. Raise the car and put securely on Jack stands.
Use wheel chocks on the front tires to prevent roll.
There's no need to remove any tires at this point
unless you feel the need to. Everything is accessible
from below.
|
|
|
|
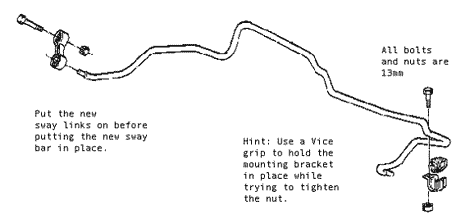
| 2. Remove the rear sway bar links using
the 13mm socket and 13mm wrench. |
3. Remove the sway bar brackets using the
13mm socket and extension.
4. Place the bolts and nuts in a secure place, you'll
need them later. |
|
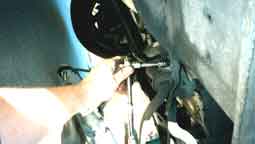
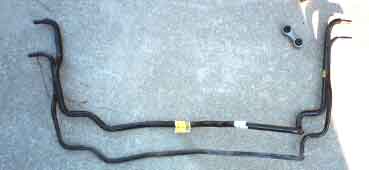
5. DO NOT remove the sway bar links from
the sway bar. They're so cheap, just replace them. Plus
unless you're a bushing magician, you'll damage them during
removal.
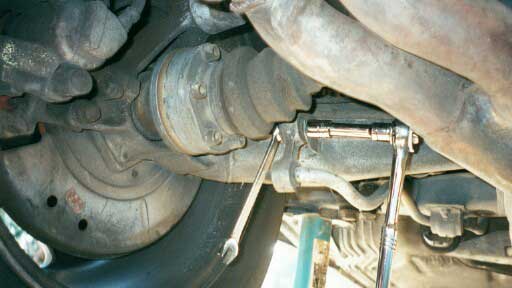
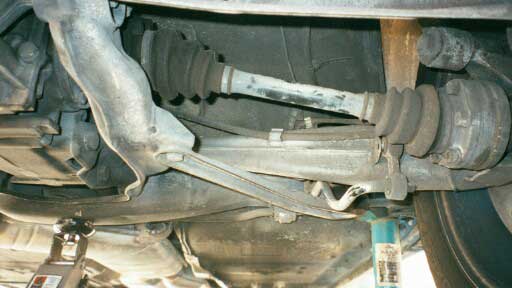
6. That was the easy part, now for the work. There's a
bracket on the right rear that will interfere with removal
of the sway bar. You don't need to remove it, just swing
it out of the way. It's held in place with an 18mm nut
and bolt. |
| 7. You'll need 2 sockets to remove it. I
used a ¾" socket to hold the top nut and a
18mm socket to turn the bottom one and that worked fine.
It takes a hard first turn to break it loose, but after
that it's simple. Once the 18mm bolt is removed, take
a 22mm socket and place it on the other end of the bracket
you'll need to give it a good solid pull and it will turn
the entire bracket. I turned the bracket toward the front
of the car, away from the wheel well. |
|
| 8. OK, now you have a loose sway bar and
no way to get it off without removing the exhaust. If
you have access to a lift, you can probably work it off.
On the ground with jack stands there's no way. Believe
me, I spent 1/2 hour trying to figure out the easiest
way to do it. |
|
|
9. Take your 13mm socket /wrenches and get
ready for removal of the sway bar from under the maze
of exhaust and brackets under the car.
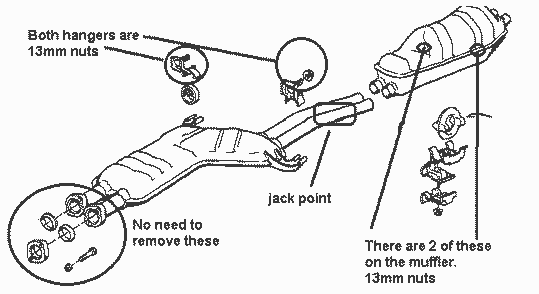
10. Take the floor jack and place it under the exhaust.
I put it under the 2 pipes, about 18 inches before entry
into the muffler. Starting at the rear, remove the muffler
brackets, you'll need the 13mm socket and extension. The
hardest one to remove is the one by the rear lower valance.
You'll need to work the socket and extension in place.
Once those are removed, move under the car and get your
13mm wrench. Remove the 13mm nut holding on the exhaust
brackets, there are 2, one on each side. Don't try and
work off the rubber hanger. Just go ahead and remove the
nut.
11. Now move back to the muffler. Let pressure off of
the jack and let the exhaust work its way down. You may
need to assist it past the left rear valance. I used a
screwdriver to help it.
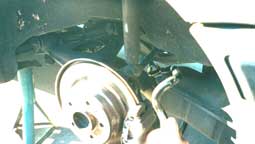
12. Now it's time to remove the wheel, remove only the
left rear. Take that one off and you'll be able to remove
the sway bar through the wheel well. Work it back to that
point of the exhaust and it will slide right out. Ok,
maybe not right out, but it is pretty easy. |
| 13. Now it's time to remove the wheel, remove
only the left rear. Take that one off and you'll be able
to remove the sway bar through the wheel well. Work it
back to that point of the exhaust and it will slide right
out. Ok, maybe not right out, but it is pretty easy. |
|
14. Now, after risking your life lying under
the car and almost blinding yourself from getting rust
in your eyes, take a break for a minute.
15. Place the new sway bar in a vertical position. Wet
the link with a soap solution and twist it slowly onto
the sway bar. Once complete, turn and repeat with the
other end.
16. With sway bar links in place work the new sway bar
through the rear wheel well and into place.
17. From this point forward, when placing on the nuts,
only tighten them to firm resistance and then where applicable
go back and tighten them to BMW torque specifications
per the Bentley.
18. Attach the sway bar links to the chassis via the 13mm
bolts.
19. Wet the new rubber bushings with soapy water and place
them into position on the sway bar. (Before you install
urethane sway bar bushings, buy a tube of Teflon grease
and place the around the bar just where the bushing will
sit. Slide the bushing sideways on the bar through the
grease and then do the same again the other way. Center
the bushing and a voila! You are done. Courtesy of Phil
C.)
20. Put the 13mm bolt into the mounting hole threads down.
21. Get the Vice Grips and have them handy.
22. Take the bracket working it into place on the rubber
sway bushing.
23. Wedge the "tab" end of the bracket into
place, working it up and using the threads from the bolt
as you guide. Strong hands help here, no room for weaklings.
24. Press up until it is in position. Take the Vice Grips
and lock the bracket into place. (Holding a bolt, nut,
bracket, wrench and socket is impossible with 2 hands.)
25. Now with the bracket in position, thread on the nut,
remove the Vice Grip and tighten up with the 13mm socket
and 13mm wrench.
26. Now with the sway bar in place go around and torque
all nuts to Bentley specs where applicable.
27. Using the floor jack raise the exhaust into place
being careful again with the rear valance.
28. Use the Vice Grips to hold the rear muffler brackets
in place and get the nuts started. Don't tighten them.
29. Use the 13mm wrenches to tighten the exhaust brackets
into place.
30. Now go back to the muffler and tighten those nuts.
31. Mount the wheel and slowly lower the car to the ground.
Tighten the wheel bolts to spec. Remove the front chocks.
· Drive and enjoy!
|
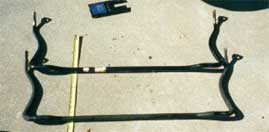
Rear 20mm compared to 15mm
Pricing for M tech Nur Touring Sway bars, 2 weeks delivery
from Germany
Price with BMWE34.net discount
2 x 31 35 1 131 622 Frt support bracket $3.42 each
2 x 31 35 1 134 582 Frt Link $21.30 each
2 x 31 35 2 226 334 Rubber mount $4.56 each
1 x 31 35 2 227 276 Frt Stabilizer bar $115.74
2 x 31 35 1 124 995 Rear support bracket $1.14 each
2 x 33 55 1 135 307 Rear link $18.36 each
2 x 33 55 2 227 240 Rubber mount $3.37 each
1 x 33 55 2 227 416 Rear Stabilizer bar $74.46
Total: $ 294.50 +s/h
To order just contact Pacific
BMW at 800-909-7278 ask for mail order dept.
|